
Upholstery Part 1- Tools and Tips
September 12, 2011 by Lynn
Filed under Featured Content, Furniture Redos
Welcome to Lynn’s Upholstery Class! Haha… I am definitely not a master of upholstery. But, hopefully I have some helpful tips for your project or can motivate you to try your hands at upholstery 
This is one of my two red chairs. I bought them on KSL for $40 buck-a-roonies. Sweet deal!

This is what I turned this lovely find into. Meet Mr. Blue Chair.

Here are the tools and tips that helped me get from red to “Mr. Blue”.


Tools!
Upholstery hammer
Rubber Mallet
Needle nose pliers
Flat head screw driver
Air compressor and an upholstery staple/nail gun
Tip! You can get a upholstery gun at Harbor Fraight Tools starting at $50. The best one you can get is called Rainco. These are around $150-200. This is the brand actually upholster’s use. I HIGHLY recommend at least getting the $50 dollar one. The staples are much better to use, especially if you mess up and need to take a staple out. The guns/staples used for wood will be really hard if not impossible to take out.)
Staples and finishing nails
Upholstery tack strip (I’ll show to a picture of this below)
Plygrip (Picture of this above “tools list” and explained in Upholstery Part Two)
Roll of cardboard strip. (Can get at Jo-Ann’s)
Depending on chair- Sewing machine
Scissors
Pen- for marking old fabric pieces

First Step:
Getting Ready
My Tips-
1. Before you take apart your chair, sit in it. Does it feel comfortable? Will you need more padding in certain areas? How firm is the seat and the back? Decide if you want to add more padding and where. Write it down!
2. Set up a work station. A place you can cut fabric, sew, a table to set the chair on, and to sit and breath
3. Take a before picture. You will want to show off your transformation! And say, “Look what I did with my bad-self! Yooza!” ….yeah you know
4. Buy some caffeinated soda. I never drink caffeine, but I drink 1/3 of two cases of diet coke during this process.

Second Step:
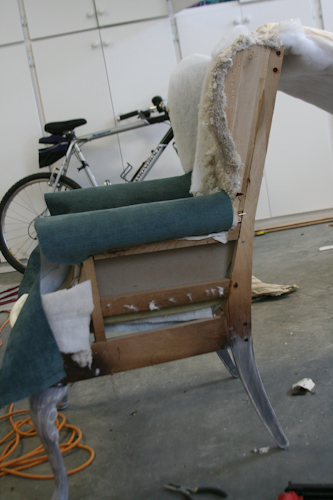
Taking apart your chair
My tips-
1. Just go for it! But…be kinda gentle. You want to take pictures along the way and keep all the pieces intact as best you can. This will be your pattern for putting it all back together.
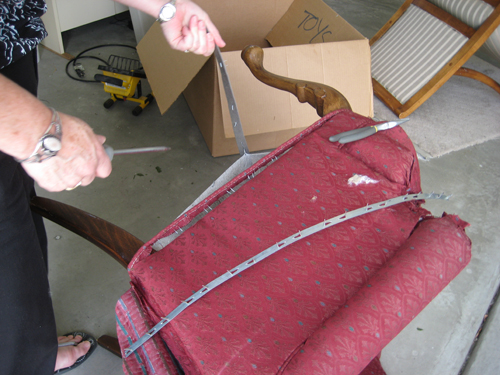
2. Take note of the hardware that is coming off your piece and where it went. In the picture above is a piece of tack strip. You can buy this from an upholstery fabric store and sometimes straight from an upholstery shop (if they are nice and share that stuff). It is usually a better price there than at a fabric store. Jo-Ann fabric’s does not carry this stuff ladies. Call around!
3. Needle nose pliers and your screw driver will come in handy here.
4. Label each piece as you remove it. Keep notes of the order pieces are coming off.


Third Step:
Before you put it back together
My tips-
1. If there is anything you want to change about the wood legs or arms, do it now. Paint, sand and stain. Do it before you start putting fabric back on
2. Get all the staples out that you can. If you can’t get them out pound them in. You don’t want any sticking out that could snag your fabric or poke you.
3. Cut out your new fabric pieces and set them in a stack with it’s labeled old fabric piece. Watch which direction your are cutting your fabric, you will want it to all go the same direction.
4. Add any padding you feel you need. I added a little on the arms, the seat, and the back. I bought some heavy quilt batting and used a glue spray to adhere it.
Fourth Step:
Putting it back together
My tips-
1. Hopefully you took note of how it came off. Check the last thing on your list and start there. For me it was the arms and the wings.
2. Lay your first pieces on. Check how they are laying and make sure the direction of your fabric is the same on both sides.
3. Start to staple! Pull fabric tight! AND be very careful!!!
4. If something needs pleats/folds, make sure you are doing the same number of them on both sides of the chair. Like the front of my chair arms.


There are a lot of tips to give! Yikes! Too many for one post. Sooo, to finish your chair click over to
Upholstery Part Two- Tricks of the Trade
to learn the rest.


Mr. Blue, you’re quite handsome