
Upholstery Part 1- Tools and Tips
September 12, 2011 by Lynn
Filed under Featured Content, Furniture Redos
Welcome to Lynn’s Upholstery Class! Haha… I am definitely not a master of upholstery. But, hopefully I have some helpful tips for your project or can motivate you to try your hands at upholstery 🙂
This is one of my two red chairs. I bought them on KSL for $40 buck-a-roonies. Sweet deal!

This is what I turned this lovely find into. Meet Mr. Blue Chair.

Here are the tools and tips that helped me get from red to “Mr. Blue”.


Tools!
Upholstery hammer
Rubber Mallet
Needle nose pliers
Flat head screw driver
Air compressor and an upholstery staple/nail gun
Tip! You can get a upholstery gun at Harbor Fraight Tools starting at $50. The best one you can get is called Rainco. These are around $150-200. This is the brand actually upholster’s use. I HIGHLY recommend at least getting the $50 dollar one. The staples are much better to use, especially if you mess up and need to take a staple out. The guns/staples used for wood will be really hard if not impossible to take out.)
Staples and finishing nails
Upholstery tack strip (I’ll show to a picture of this below)
Plygrip (Picture of this above “tools list” and explained in Upholstery Part Two)
Roll of cardboard strip. (Can get at Jo-Ann’s)
Depending on chair- Sewing machine
Scissors
Pen- for marking old fabric pieces

First Step:
Getting Ready
My Tips-
1. Before you take apart your chair, sit in it. Does it feel comfortable? Will you need more padding in certain areas? How firm is the seat and the back? Decide if you want to add more padding and where. Write it down!
2. Set up a work station. A place you can cut fabric, sew, a table to set the chair on, and to sit and breath 🙂
3. Take a before picture. You will want to show off your transformation! And say, “Look what I did with my bad-self! Yooza!” ….yeah you know 🙂
4. Buy some caffeinated soda. I never drink caffeine, but I drink 1/3 of two cases of diet coke during this process. 🙂

Second Step:
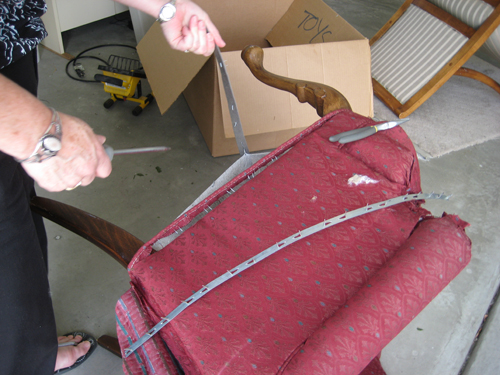
Taking apart your chair
My tips-
1. Just go for it! But…be kinda gentle. You want to take pictures along the way and keep all the pieces intact as best you can. This will be your pattern for putting it all back together.
2. Take note of the hardware that is coming off your piece and where it went. In the picture above is a piece of tack strip. You can buy this from an upholstery fabric store and sometimes straight from an upholstery shop (if they are nice and share that stuff). It is usually a better price there than at a fabric store. Jo-Ann fabric’s does not carry this stuff ladies. Call around!
3. Needle nose pliers and your screw driver will come in handy here.
4. Label each piece as you remove it. Keep notes of the order pieces are coming off.


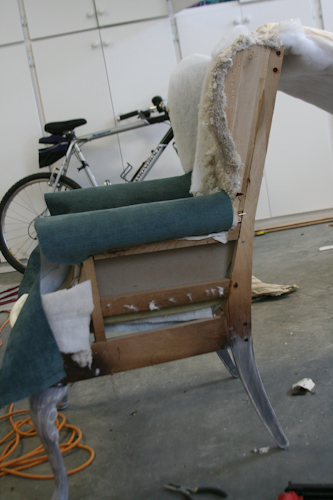
Third Step:
Before you put it back together
My tips-
1. If there is anything you want to change about the wood legs or arms, do it now. Paint, sand and stain. Do it before you start putting fabric back on 🙂
2. Get all the staples out that you can. If you can’t get them out pound them in. You don’t want any sticking out that could snag your fabric or poke you.
3. Cut out your new fabric pieces and set them in a stack with it’s labeled old fabric piece. Watch which direction your are cutting your fabric, you will want it to all go the same direction. 🙂
4. Add any padding you feel you need. I added a little on the arms, the seat, and the back. I bought some heavy quilt batting and used a glue spray to adhere it.
Fourth Step:
Putting it back together
My tips-
1. Hopefully you took note of how it came off. Check the last thing on your list and start there. For me it was the arms and the wings.
2. Lay your first pieces on. Check how they are laying and make sure the direction of your fabric is the same on both sides.
3. Start to staple! Pull fabric tight! AND be very careful!!!
4. If something needs pleats/folds, make sure you are doing the same number of them on both sides of the chair. Like the front of my chair arms.


There are a lot of tips to give! Yikes! Too many for one post. Sooo, to finish your chair click over to
Upholstery Part Two- Tricks of the Trade
to learn the rest. 🙂


Walmart + Fashion (Can this add up?)
September 1, 2011 by Lynn
Filed under Fashion, Featured Content
Can Walmart possibly have cute clothes?! Why yes they can. And, thankfully, they do.

My mom was in town a week ago (Helping me reupholster some chairs which you will see soon!!! be excited!). Her and I had to make a 10pm milk run to Wally World (Walmart).
When we got there we saw this Bella Bird brand of clothing. I was kinda shocked that they had so many cute things.


The clothes are all from Walmart. The shoes are from Payless and the belt is from the sale rack in Target.

The neckline was prefect too. Not too low cut, but a nice scoop. Just how I like it!

And nice prices too. Prefect for my new budgeting ways. Good job Walmart and good job Bella Bird!
Look at me getting fashionable with my bad self … at Walmart of all places. 🙂

Blue Dresser
August 4, 2011 by Lynn
Filed under Featured Content, Furniture Redos
My sister in-law and I have been working are to make our new houses our homes. She had this dresser and armoire from when she was in high school and wanted to change it up.


We did mostly the same steps that are used on the TV stand I did earlier. We used a 220 and 150 grit sand paper to rough it up. Painted three coats of blue with a little sanding between each layer of paint. We made a little diagram to remind us where the distressing would be and sanded those places extra well between painting. We use a clear non-yellowing polyurethane to top coat it.

I forgot to take a picture of the armoire. I’ll have to go back over to get one. I will also post the paint color we used.

Beachy/Barn Look- Furniture Painting Tips
July 7, 2011 by Lynn
Filed under Featured Content, Furniture Redos, Home and Garden
For this night stand I wanted that “has been in a barn- painted too many coats-looks kinda beach-y” look. Hahaha you like that description?
I found this gem on KSL for $50 and every penny went to charity, so that’s nice.


It was already great looking for my room, but I wanted to add some color and make it have “the look” I wanted. I just took a trip to Florida and all the furniture in the beach house we stayed in was painted in a fun colorful way. I wanted that look in my bedroom. Here are some of the pieces from the room we stayed in that inspired me.


Fun huh?!
Yes, so how do I achieve that lived in a barn/beachy look?!? Here’s how. SIMPLE!
Don’t sand your piece before painting. (sorry for the blurry picture, it was really late when I did this)
Most of the time you need to sand before you paint, so the paint can stick evenly to your all over piece. But since you don’t want the paint to stick all the way, skip the sanding! Yaahooo! Makes this project go much faster too. I like that 🙂

Paint then lightly sand off some of the paint until you get your desired look. I used #220 and #150 grit sand paper

I painted and sanded, then repeated once more to cover a little better.


I top coated twice with a foam brush. And added these handles from Anthropologie. I have had them forever, but didn’t have anything to put them on, this was perfect.
I am very pleased with how this turned out. 🙂 Beachy-barn here I come 🙂

I’ll photograph it in the bedroom when I get the room done. (It will be a while) 🙂

TV Stand- Refinishing, Distressing, Antiquing
July 7, 2011 by Lynn
Filed under Featured Content, Furniture Redos, Home and Garden

I bought this dresser off KSL – (Utah’s version of Craigslist) – for $80. I then got to work.
Here is how I transformed this dresser into my TV stand

I started by going into one of my favorite Utah furniture stores that specializes in painting wood furniture. They helped me pick out the paints I wanted and gave me a few tips on how to tackle this project. I want to share these tips with you and more that I learned from trial and error 🙂
The first thing you want to do when refinishing a piece is sand. I used a #220 grit sand paper to sand this baby down. Since I was painting the whole piece I didn’t worry too much about getting all the way down to the wood (except in the areas I wanted to see a more distressed look). I made myself a little map of where those areas were before I started to paint. You really just need to sand enough for the paint to have something to stick to. After sanding, I then wiped down piece completely to get rid of dust.

I then applied a thin coat of paint with a foam brush (this helps to minimize brush strokes and get a more even layer) I let this dry about 5-6 hours, then I used my #220 grit sand paper to lightly sand again. I made sure to look back at my distressing map to sand those areas extra well. Wiped it down again and painted again. Repeating these steps until the grain of the wood was no longer visible.


After the brown paint was done being applied I used a #150 grit sand paper for extra distressing. I wiped it down and added in my pops of baby blue, green, and teal. I used the foam brush and an art paint brush to cover the small areas. I sanded down the distressed areas onces more with my #220 and #150 sand paper.

I then added a dark brown glaze over the top of the whole piece. I let this dry for 2 days.


Finally I added a top coat. I very lightly sanded/buffed the piece with #600 grit sand paper. Wiped it again. Then following the directions on my top coat can, began to apply it with a foam brush. I let it dry a day, then sanded, wiped, brushed on the top coat again. I did this three times. Then I was done! This took about a month for me from start to finish. I was more work than I thought, but it turned out great.


More Tips!
Remember to stir the top coat. Do not shake it or that will create bubbles.
Use an actually glaze not a stain to go over your piece for the antiqued look. Stain will wipe off as you add your top coat. Very frustrating. Don’t listen to anyone who tells you to use a stain over a layer of paint. It doesn’t stay on.
Foam brushes work great, buy them from Micheal’s. They are better quality there than Home Depot.
Flow-trol also is great for smoothing out paint brush lines. Just add it to your paint can.
I took out the top two drawers to store our TV components and I spray painted the handles.

I hope these tips help you with your next project!
Done piece!


Tulips and Fish
May 4, 2011 by Lynn
Filed under Decorating, Home and Garden
I have had these bottles forever, but in a box….
I just moved and now have the counter space to put them out. I love them. I bought these at an estate sale in San Diego. I have many favorite finds from estate sales. ( Hmm.. I’ll share the rest in another post soon). Any-who, there are lots of tulips in my new yard so I thought they’d be fun in my fishy bottles. 🙂 Makes me happy to have fresh flowers in my house.


I love the details on these bottles.


Do you have a fun vase that makes your heart happy? Please share it by e-mail lynnspins@gmail.com and maybe I’ll add it to this post. 🙂

Dresser Re-do!
March 2, 2011 by Lynn
Filed under Furniture Redos, Home and Garden
I bought this dresser on Craigslist. I sanded it, primed, and painted it. I spray painted the handles off-white.

This is how it turned out!

I still need to add that last handle. But, I think it turned out perfect!


Nasty White Tile and Dirty Grout!
February 8, 2011 by Lynn
Filed under Cleaning, Home and Garden
Yuck! I hate this tile… it annoys me so. Today in my madness of spring-ish cleaning, I thought I conquer the nasty dirty grout. I feel like I have tried so many things to clean this. But! good news I found something. AND MAN! It was amazing. Who knew Lemons and Baking Soda! My friend Cynthia did a little class once on using lemons to clean and inspired my to try this out.
I didn’t measure things out. I used one lemon and a whole-lotta baking soda to make a paste. I spread it around my grout and then scrubbed a little. Waa laa magic!
Dirty

Dirty

Clean!

My Relief Society group had a night of lemons! With little mini classes on cleaning, decorating, and eating them. Very fun night.
Relief Society is a world wide organization for women. Find out more by clicking here.
Princess Birthday Cake
January 17, 2011 by Lynn
Filed under Cake, Entertaining, Yummy Food
Ah ahhhhh! (singing like it’s amazing) Cuz it totally is haha!

I found a you-tube video from Howdini on how to make a princess cake (that you can find here) and made my first ever decorated cake for Charlie’s 3rd birthday. Holy Cow! It wasn’t too hard, but starting the task was. Here is a little tutorial of pictures if you need to make a princess cake. At the end of the pictures I also show two smaller versions I made up myself using the same techniques I learned from the you-tube video. They turned out very cool and totally made my 3 year olds day. (I felt like a pretty awesome mom, not gonna lie ;))

My pictures for this post are pretty crappy. I was in a hurry and it was really dark. oh well… here’s the info.
I don’t make cakes from scratch so, Betty Crocker cake mix and frosting, food coloring, sprinkles, 5 ice cream cones, and a few princesses from the dollar store.

Made my 4 9×9 cakes. Put the wax paper down so I don’t get frosting on the plate, can pull them out when all done and have a clean plate. Sandra Lee from Food Network taught me that. Ok, used my bread knife and cut the top off so it was flat.

Put some frosting on top- in between the layers.

Three on the bottom. Then cut your forth piece in to fourths, use two of those for the middle, then cut on the remaining fourths in to fourths again and put two of those on the very top. Watch the video if I don’t make sense. It’s good and quick.
Put the cake in the fridge to harden up a bit, before frosting it.

Mix up your frosting
 Nice and Pink

Give the cake a thin coat of frosting- there’s a term for this they use in the video- but I am a first timer 😉 Then place it back in the fridge to harden. It’s easier to frost this way.
When its hard enough take it out and give it a thick frosting. You can then pull out the wax paper if you want, or wait till the very end.

Now for the fun part- decorating! Put your sprinkles on a plate.
Frost your ice cream cones.
Roll them in sprinkles

Place on the cake

Now add the rest of the decorations. I used a gram cracker for a door. Frosted it, put sprinkles on it. The used a dab of frosting to glue it to the cake.


 I added little pre-made sugar flowers as door handles and mini marshmallows for fun.
 Added the princesses, candles, and a little sprinkles and Done!

Sweet Success!
How to make that cute birthday banner in back, click here.
A week later my friend and I threw a combined party for our girls who are 8 days apart. I made a little smaller version for each of them.

If I was to make this again I would have put two cake layers on the bottom instead of one. I used card board to set the cakes on, sour string candy on the layers, white chocolate chips at the ends of the candy, and lots of sprinkles all around. Oh and I used tooth picks to hold the princesses on.


The party was at Kidsville in San Diego. It was a blast!
Make a Cake with Your BAD Self!
Holiday Napkins
November 22, 2010 by Lynn
Filed under Entertaining, Holiday Crafts, Thanksgiving

Napkins for Thanksgiving or Christmas
You will need a scissors or rotary cutter, sewing machine, thread, fabric that frays easy.
Cut fabric into a 16×16 inch square

Sew in 1/2 inch along edge

Fray by hand, or stick in washing machine and dryer- speeds up the process
And your done!
I don’t have a finished cute picture…dang! But, you can take one for me after you finish yours 😉
Make Napkins with Your Bad Self!- They are so expensive, making 20 cost me 2 dollars! Yeah baby!

