
Posing for Family Photos
September 20, 2011 by Lynn
Filed under Photography
This is the beautiful B-family. I had a blast photographing them last week. I was a little worried about posing. So, I did some research online. I looked up photographers and photo’s of families I liked and took notes! I think these poses turned out great! And I think these were the best kids to photograph, they were so awesome.
Thanks for letting me practice on your family Whitney and Dustin!!
(look to bottom of post for links to some awesome and inspiring photo blogs)


Fun times! PS I bought that couch for $5 at a garage sale. 
Check these guys out:
http://ashleeraubachphotography.blogspot.com/
http://lacidavisphotography.blogspot.com/2009/11/what-to-wear-for-your-family-photos.html

Upholstery Part 3- Buttons
September 20, 2011 by Lynn
Filed under Featured Content, Furniture Redos, Home and Garden
I was a little worried about the buttons. But, it was actually one of the easiest parts.
Here is the Chair before we started

Sorry it’s so small, pic was taken on phone. These are my sister-in-laws chairs that we found on KSL. She got them for 25 each and her fabric was free from a designer friend of her’s. There was a million upholstery nails and buttons on this chair. It took 6 hours to take the upholstery nail out of this chair. Yikes! Pay attention when you buy a chair to redo. We were first timers. Also, we bought these from a super creepy old man who wanted to ask me on a date lol. He could have been my dad. CREEPY! He told me he liked my freckles hahaha…eww

We bought some metal buttons from Jo-ann’s and covered them. Using the existing buttons holes in the back, we mapped out the placement of the buttons. Then started putting them on.


Used upholstery wax thread and a large needle. Wrap the thread around the button shaft a few times. Then pull needle again through to the back.

We then pulled as tight as we thought looked good and tied a knot in the back. If we could get it tight enough we put a tooth pick in and twisted it till it matched the other buttons in the front.


Then place the backing on and finish up the chair


BUTTONS!!

The white paper is my “chair to do list” Good to have one of those.
Done!

Upholstery Part 2- Tricks of the Trade
September 12, 2011 by Lynn
Filed under Featured Content, Furniture Redos
Are you feeling overwhelmed with that chair you bought that is still sitting in the garage?! And the hubs is like, “Can we please get that piece of junk out of here.” But then your like…”I have a dream for that ugly old thing. I WILL make it new again!”
And then I say, “You GO GIRL! Get crafty with your bad self! Yahhooza!”
haha, ok ok let’s get down to business.
When my mom and I were feeling a little stuck we called an upholstery shop. Thankfully we got a hold of the SUPER nice gentle man who owns the shop. We told him we were redoing some chairs and were having a hard time with a few things. He told us to come on down to his store and he would show us what to do. So kids and a DVD player in-tow, we headed over to the shop. And these are a few of the awesome things we learned in about 10 mins.
Tip 1
When you are trying to end a piece of piping trim out the rope from the inside of the fabric cover. This will help the piping to hide under the top fabric with out a bump.

See no bump!

Tip 2
Use finishing nails to hold certain pieces on to the fabric. You will need a bit of card board behind the fabric, like in the arm end. (see picture below) Then use an ice pick or other sharp pointy poker to pull/pop the top of the fabric up around the nail. The fabric will stay in place, but the nail won’t show.

I used a bead making tool to pull the fabric up over the nails (very poky tool). This fabric is wrapped around a piece of cardboard to help it hold it’s shape and to help nail it into place.

Tip 3
Use cardboard to help keep bumps in fabric to a minimum. It comes in handy if there is a lot of bulk, like batting, pipping, and fabric.


Tip 4
When you upholster you really need to pull the fabric tight before you staple it down. In some places this can be a bit tricky. You can sew a piece of thin pellon to the sides where you need something to pull. Like in the picture below, see where the white fabric is sticking out? That is where we pull and then staple that to the chair.

Here are some pictures of the arm as well.
inside of chair

outside of chair
You can see the white piece sticking out the bottom. We didn’t pull it yet.

Tip 5
This one was and IS a life saver.
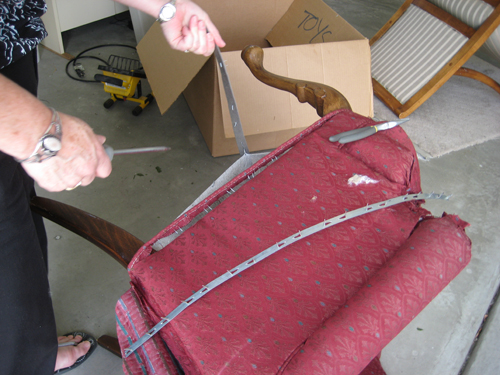
This metal piece is called plygrip. It is used to clamp the fabric down around curves. It is awesome! Below are a few pictures from my phone when the upholstery guy was showing me how to use it.

This is the example the upholstery shop owner showed me.

The plygrip is like a clamp. One side you staple to the piece and the other has teeth that hold the fabric in place. Once you fold/push the fabric edge into the inside of the clamp and hammer it down, it makes a nice clean edge.
Tip 6
This metal piece is called tack strip. You will probably see this in your chair when you are taking it apart. You wrap it around the fabric (spikes going through the fabric) and pound it in to the wood. It is usually on the back two sides. It is the last step in putting together your chair!


Upholstery Part 1- Tools and Tips
September 12, 2011 by Lynn
Filed under Featured Content, Furniture Redos
Welcome to Lynn’s Upholstery Class! Haha… I am definitely not a master of upholstery. But, hopefully I have some helpful tips for your project or can motivate you to try your hands at upholstery
This is one of my two red chairs. I bought them on KSL for $40 buck-a-roonies. Sweet deal!

This is what I turned this lovely find into. Meet Mr. Blue Chair.
Here are the tools and tips that helped me get from red to “Mr. Blue”.


Tools!
Upholstery hammer
Rubber Mallet
Needle nose pliers
Flat head screw driver
Air compressor and an upholstery staple/nail gun
Tip! You can get a upholstery gun at Harbor Fraight Tools starting at $50. The best one you can get is called Rainco. These are around $150-200. This is the brand actually upholster’s use. I HIGHLY recommend at least getting the $50 dollar one. The staples are much better to use, especially if you mess up and need to take a staple out. The guns/staples used for wood will be really hard if not impossible to take out.)
Staples and finishing nails
Upholstery tack strip (I’ll show to a picture of this below)
Plygrip (Picture of this above “tools list” and explained in Upholstery Part Two)
Roll of cardboard strip. (Can get at Jo-Ann’s)
Depending on chair- Sewing machine
Scissors
Pen- for marking old fabric pieces

First Step:
Getting Ready
My Tips-
1. Before you take apart your chair, sit in it. Does it feel comfortable? Will you need more padding in certain areas? How firm is the seat and the back? Decide if you want to add more padding and where. Write it down!
2. Set up a work station. A place you can cut fabric, sew, a table to set the chair on, and to sit and breath
3. Take a before picture. You will want to show off your transformation! And say, “Look what I did with my bad-self! Yooza!” ….yeah you know
4. Buy some caffeinated soda. I never drink caffeine, but I drink 1/3 of two cases of diet coke during this process.

Second Step:
Taking apart your chair
My tips-
1. Just go for it! But…be kinda gentle. You want to take pictures along the way and keep all the pieces intact as best you can. This will be your pattern for putting it all back together.
2. Take note of the hardware that is coming off your piece and where it went. In the picture above is a piece of tack strip. You can buy this from an upholstery fabric store and sometimes straight from an upholstery shop (if they are nice and share that stuff). It is usually a better price there than at a fabric store. Jo-Ann fabric’s does not carry this stuff ladies. Call around!
3. Needle nose pliers and your screw driver will come in handy here.
4. Label each piece as you remove it. Keep notes of the order pieces are coming off.


Third Step:
Before you put it back together
My tips-
1. If there is anything you want to change about the wood legs or arms, do it now. Paint, sand and stain. Do it before you start putting fabric back on
2. Get all the staples out that you can. If you can’t get them out pound them in. You don’t want any sticking out that could snag your fabric or poke you.
3. Cut out your new fabric pieces and set them in a stack with it’s labeled old fabric piece. Watch which direction your are cutting your fabric, you will want it to all go the same direction.
4. Add any padding you feel you need. I added a little on the arms, the seat, and the back. I bought some heavy quilt batting and used a glue spray to adhere it.
Fourth Step:
Putting it back together
My tips-
1. Hopefully you took note of how it came off. Check the last thing on your list and start there. For me it was the arms and the wings.
2. Lay your first pieces on. Check how they are laying and make sure the direction of your fabric is the same on both sides.
3. Start to staple! Pull fabric tight! AND be very careful!!!
4. If something needs pleats/folds, make sure you are doing the same number of them on both sides of the chair. Like the front of my chair arms.


There are a lot of tips to give! Yikes! Too many for one post. Sooo, to finish your chair click over to
Upholstery Part Two- Tricks of the Trade
to learn the rest.

Lynnie’s Raspberry Cheesecake Crumble
September 1, 2011 by Lynn
Filed under Dessert, Featured Content, Yummy Food

Sorry this post has been moved to my new blog. Please click the image below to get to the recipe.


Walmart + Fashion (Can this add up?)
September 1, 2011 by Lynn
Filed under Fashion, Featured Content
Can Walmart possibly have cute clothes?! Why yes they can. And, thankfully, they do.

My mom was in town a week ago (Helping me reupholster some chairs which you will see soon!!! be excited!). Her and I had to make a 10pm milk run to Wally World (Walmart).
When we got there we saw this Bella Bird brand of clothing. I was kinda shocked that they had so many cute things.


The clothes are all from Walmart. The shoes are from Payless and the belt is from the sale rack in Target.

The neckline was prefect too. Not too low cut, but a nice scoop. Just how I like it!

And nice prices too. Prefect for my new budgeting ways. Good job Walmart and good job Bella Bird!
Look at me getting fashionable with my bad self … at Walmart of all places.


