
Shared Boy/Girl Room
January 28, 2013 by Lynn
Filed under Crafts, Decorating, DIY, Featured Content, Furniture Redos, Home and Garden
When sweet little number 3 came along, I wanted her to be in her own room. I wanted to put the kids who where on the same sleep scheduled in the same room. That way there would be less waking me up!  And I felt little Ruby Lou would be safer if she didn’t have a loving sibling trying to give her an extra blanket or stuffed animal. So, my only solution was to put the two oldest in the same room. How do I decorate a boy/girl room without it being too masculine or too famine?! I decided I would start with fabric and go from there. After a fabric hunt I found my base for the room colors. (Which are the drapes) My mom and dad sent down my old bed frames from Washington and I painted them a color from the drapes. And I went from there…

Here are some pictures. I will post more info on the art and other tidbits around the room later. I am doing the reveal first hahaha….
My friend (who has a super cute house and blog, click HERE for The Rooster and The Hen) gave me the idea to paint the beds this teal color, pulled from the drapery fabric.
To see how I painted the beds Click HERE
-The room looked like this before-


-At first I tried to go this route-

It just wasn’t working for me.
So I changed it up!


I took some pictures of my midgets to put up in their room. Bought the shelves from Ikea and painted them yellow. And made some art to put up. They helped me make the “Every freckle on my face is where it’s supposed to be.” quote art work. And they had a blast. I’ll post pictures of that later
(Quote from and India Arie song. Love her songs!)


Now don’t worry, these are not really hanging from the rope. I have earthquake wall hooks on the back, these babes are not going any where! Safety first!!
I made these out silhouettes of plywood and paint that I had in the garage. I watered down my paint and sanded after I painted to give these a distressed look. I added the rope and make the “faux” mustard yellow wall hooks. Pretty dang cute I think!

I put up these picture boards, I had them laying around the house. I want to have lots of pictures around my house
and I knew my kids would think this was super cool. It is up pretty high so they can’t reach the tacks.

I have been seeing all those cute “Read” signs on Pinterest and wanted to do one similar.
But, I didn’t want it to seem like I was demanding someone to read, lol, so I added the “we love 2” part.
The heart is from the top of a cardboard box near the letters at Hobby Lobby.
By the way! I do not recommend these Ikea spice racks for book shelves. The books fall off all the time.
The “animal cage” as we like to call it was built by little ol’ me!

I didn’t know what to do with all the stuffed animals my kids have. I had them pick out some to donate, I was sneaky and got rid of a few, but they still had so many.
So I thought up the idea for this bin. I measured they space under the books and made this one morning while my kids where at school. I will share that tutorial soon too.
I love it! And it cost me about $8 or less.

I thought a lot about bedding for this room. That was probably the hardest part. I looked everywhere! I bought a few different things, tried them and sent them back. I ended up going with these from the Land of Nod. They were both on sale for about $25 bucks each. It was my husbands idea to do a blue and a pink. I love how it all came together.


How I Paint Furniture
July 15, 2012 by Lynn
Filed under Crafts, DIY, Featured Content, Furniture Redos, Home and Garden
This post has been moved to my new blog.

Jute Piping=Much Better!
March 20, 2012 by Lynn
Filed under Featured Content, Furniture Redos, Home and Garden
Okay, so here is the first before picture!

I bought these chairs at an estate sale in San Diego about 4 years ago. And they looked liked this till about 6 months ago.
I took them apart and used the fabric as a pattern.

Then I made yellow piping and the chairs looked like this….

Then my sister came to visit and told me they made her hungry for Mexican food.
Soooo!
Now the chairs look like this!

I did a flat braided jute around the top and a pre-made jute piping around the bottom.
I bought both of the different jutes at Walmart. And, yes I hot glued it on. That IS what the pro’s do just so ya know. Some lady laughed when I told her I used hot glue….go talk to your local upholster if you are unsure what to do in any part of the process of redoing your chairs. They are usually more than happy to share some trade secrets and help you out.
I think it looks MUCH BETTER!


Making my house feel more like home!
Does This Make YOU Hungry?
March 9, 2012 by Lynn
Filed under Featured Content, Furniture Redos
I tried really hard to find a color for piping that would help my chairs pop. I decided on a mustard yellow…. it’s not popping the way I was hoping. ALL that work of making piping! Ugh…
I asked my sister, who was visiting over Christmas, what she thought. I was trying to convince myself to just finish them and not change the pipping.
When! She said, “Kinda makes me hungry for Mexican food.”
Uh…. haha, not what what I was hoping to hear, but TRUTH people! Dang it!


So!! Stay tuned for Monday when I reveal the final changes!
Finishing Wax- Blue Hutch
October 3, 2011 by Lynn
Filed under Featured Content, Furniture Redos, Home and Garden
When I first moved to Utah six months ago I called my best friend to complain. That’s what best buds are for right? 😉 Actually they are there for helping you get out of your funk. And that’s what my buddy did. I whined about how my stuff didn’t fit in this house and she kindly listened. Then she wisely said, “Why don’t you go buy a cool hutch and paint it a fun color. You are good at that.” I looked over the wall where this future hutch would go, imagined it, and said, “That is why you are my best friend!”
I started my search on KSL that day and found a hutch for $80. Bought some paint. Then…. let it sit in the garage for a month or three, lol, then got crack’n.

Half way into priming it I realized I didn’t take a “Before” picture…oops
I primed it with a gray primer I had left over from painting my kitchen cabinets in my CA house. I used a regular wall paint brush to apply it. This gave it heavy brush stroke marks, which I wanted.


Then I painted a blue over the top with a foam brush. Foam brush does not leave marks. But you could still see the ones underneath a little. I put two coats of blue on. Then….
I went crazy with my sander.


But after my craziness I realized I really didn’t like the light wood showing through. So I stained it green. I took green paint brushed it on, then wiped it off after a second or two.

I also willy nilly brushed on some color to different spots. And then went over the whole piece with a navy blue glaze.


After I was done I decided to try using a wax instead of a polyurethane; which I usually use to finish furniture.
I loved it! I will definitely be using it again. Super easy. Just get a rag, wipe it on. Wait until it is no longer tacky to the touch and then with a dry clean rag, rub the piece till it shines just a bit.


This is how it turned out.

I am still trying to figure out what to put on it. I want to get some fun frames and put our family pictures on it. But for now, my parents grace the shelves.

I bought some fun glass handles from Home Depot for the doors.


It will all come together soon. I hope

 Leave me some comment LOVE
Upholstery Part 3- Buttons
September 20, 2011 by Lynn
Filed under Featured Content, Furniture Redos, Home and Garden
I was a little worried about the buttons. But, it was actually one of the easiest parts.
Here is the Chair before we started

Sorry it’s so small, pic was taken on phone. These are my sister-in-laws chairs that we found on KSL. She got them for 25 each and her fabric was free from a designer friend of her’s. There was a million upholstery nails and buttons on this chair. It took 6 hours to take the upholstery nail out of this chair. Yikes! Pay attention when you buy a chair to redo. We were first timers. Also, we bought these from a super creepy old man who wanted to ask me on a date lol. He could have been my dad. CREEPY! He told me he liked my freckles hahaha…eww

We bought some metal buttons from Jo-ann’s and covered them. Using the existing buttons holes in the back, we mapped out the placement of the buttons. Then started putting them on.


Used upholstery wax thread and a large needle. Wrap the thread around the button shaft a few times. Then pull needle again through to the back.

We then pulled as tight as we thought looked good and tied a knot in the back. If we could get it tight enough we put a tooth pick in and twisted it till it matched the other buttons in the front.


Then place the backing on and finish up the chair


BUTTONS!!

The white paper is my “chair to do list” Good to have one of those.
Done!

Upholstery Part 2- Tricks of the Trade
September 12, 2011 by Lynn
Filed under Featured Content, Furniture Redos
Are you feeling overwhelmed with that chair you bought that is still sitting in the garage?! And the hubs is like, “Can we please get that piece of junk out of here.” But then your like…”I have a dream for that ugly old thing. I WILL make it new again!”
And then I say, “You GO GIRL! Get crafty with your bad self! Yahhooza!”
haha, ok ok let’s get down to business.
When my mom and I were feeling a little stuck we called an upholstery shop. Thankfully we got a hold of the SUPER nice gentle man who owns the shop. We told him we were redoing some chairs and were having a hard time with a few things. He told us to come on down to his store and he would show us what to do. So kids and a DVD player in-tow, we headed over to the shop. And these are a few of the awesome things we learned in about 10 mins.
Tip 1
When you are trying to end a piece of piping trim out the rope from the inside of the fabric cover. This will help the piping to hide under the top fabric with out a bump.

See no bump!

Tip 2
Use finishing nails to hold certain pieces on to the fabric. You will need a bit of card board behind the fabric, like in the arm end. (see picture below) Then use an ice pick or other sharp pointy poker to pull/pop the top of the fabric up around the nail. The fabric will stay in place, but the nail won’t show.

I used a bead making tool to pull the fabric up over the nails (very poky tool). This fabric is wrapped around a piece of cardboard to help it hold it’s shape and to help nail it into place.

Tip 3
Use cardboard to help keep bumps in fabric to a minimum. It comes in handy if there is a lot of bulk, like batting, pipping, and fabric.


Tip 4
When you upholster you really need to pull the fabric tight before you staple it down. In some places this can be a bit tricky. You can sew a piece of thin pellon to the sides where you need something to pull. Like in the picture below, see where the white fabric is sticking out? That is where we pull and then staple that to the chair.

Here are some pictures of the arm as well.
inside of chair

outside of chair
You can see the white piece sticking out the bottom. We didn’t pull it yet.

Tip 5
This one was and IS a life saver.
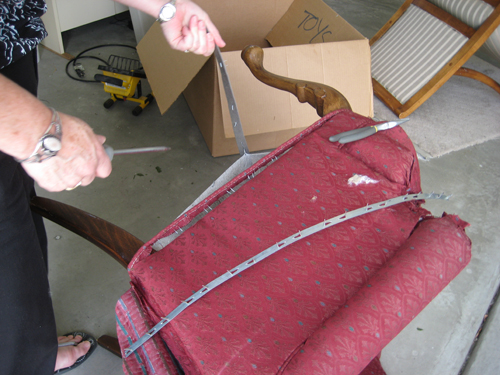
This metal piece is called plygrip. It is used to clamp the fabric down around curves. It is awesome! Below are a few pictures from my phone when the upholstery guy was showing me how to use it.

This is the example the upholstery shop owner showed me.

The plygrip is like a clamp. One side you staple to the piece and the other has teeth that hold the fabric in place. Once you fold/push the fabric edge into the inside of the clamp and hammer it down, it makes a nice clean edge.
Tip 6
This metal piece is called tack strip. You will probably see this in your chair when you are taking it apart. You wrap it around the fabric (spikes going through the fabric) and pound it in to the wood. It is usually on the back two sides. It is the last step in putting together your chair!


Upholstery Part 1- Tools and Tips
September 12, 2011 by Lynn
Filed under Featured Content, Furniture Redos
Welcome to Lynn’s Upholstery Class! Haha… I am definitely not a master of upholstery. But, hopefully I have some helpful tips for your project or can motivate you to try your hands at upholstery
This is one of my two red chairs. I bought them on KSL for $40 buck-a-roonies. Sweet deal!

This is what I turned this lovely find into. Meet Mr. Blue Chair.
Here are the tools and tips that helped me get from red to “Mr. Blue”.


Tools!
Upholstery hammer
Rubber Mallet
Needle nose pliers
Flat head screw driver
Air compressor and an upholstery staple/nail gun
Tip! You can get a upholstery gun at Harbor Fraight Tools starting at $50. The best one you can get is called Rainco. These are around $150-200. This is the brand actually upholster’s use. I HIGHLY recommend at least getting the $50 dollar one. The staples are much better to use, especially if you mess up and need to take a staple out. The guns/staples used for wood will be really hard if not impossible to take out.)
Staples and finishing nails
Upholstery tack strip (I’ll show to a picture of this below)
Plygrip (Picture of this above “tools list” and explained in Upholstery Part Two)
Roll of cardboard strip. (Can get at Jo-Ann’s)
Depending on chair- Sewing machine
Scissors
Pen- for marking old fabric pieces

First Step:
Getting Ready
My Tips-
1. Before you take apart your chair, sit in it. Does it feel comfortable? Will you need more padding in certain areas? How firm is the seat and the back? Decide if you want to add more padding and where. Write it down!
2. Set up a work station. A place you can cut fabric, sew, a table to set the chair on, and to sit and breath
3. Take a before picture. You will want to show off your transformation! And say, “Look what I did with my bad-self! Yooza!” ….yeah you know
4. Buy some caffeinated soda. I never drink caffeine, but I drink 1/3 of two cases of diet coke during this process.

Second Step:
Taking apart your chair
My tips-
1. Just go for it! But…be kinda gentle. You want to take pictures along the way and keep all the pieces intact as best you can. This will be your pattern for putting it all back together.
2. Take note of the hardware that is coming off your piece and where it went. In the picture above is a piece of tack strip. You can buy this from an upholstery fabric store and sometimes straight from an upholstery shop (if they are nice and share that stuff). It is usually a better price there than at a fabric store. Jo-Ann fabric’s does not carry this stuff ladies. Call around!
3. Needle nose pliers and your screw driver will come in handy here.
4. Label each piece as you remove it. Keep notes of the order pieces are coming off.


Third Step:
Before you put it back together
My tips-
1. If there is anything you want to change about the wood legs or arms, do it now. Paint, sand and stain. Do it before you start putting fabric back on
2. Get all the staples out that you can. If you can’t get them out pound them in. You don’t want any sticking out that could snag your fabric or poke you.
3. Cut out your new fabric pieces and set them in a stack with it’s labeled old fabric piece. Watch which direction your are cutting your fabric, you will want it to all go the same direction.
4. Add any padding you feel you need. I added a little on the arms, the seat, and the back. I bought some heavy quilt batting and used a glue spray to adhere it.
Fourth Step:
Putting it back together
My tips-
1. Hopefully you took note of how it came off. Check the last thing on your list and start there. For me it was the arms and the wings.
2. Lay your first pieces on. Check how they are laying and make sure the direction of your fabric is the same on both sides.
3. Start to staple! Pull fabric tight! AND be very careful!!!
4. If something needs pleats/folds, make sure you are doing the same number of them on both sides of the chair. Like the front of my chair arms.


There are a lot of tips to give! Yikes! Too many for one post. Sooo, to finish your chair click over to
Upholstery Part Two- Tricks of the Trade
to learn the rest.

Blue Dresser
August 4, 2011 by Lynn
Filed under Featured Content, Furniture Redos
My sister in-law and I have been working are to make our new houses our homes. She had this dresser and armoire from when she was in high school and wanted to change it up.


We did mostly the same steps that are used on the TV stand I did earlier. We used a 220 and 150 grit sand paper to rough it up. Painted three coats of blue with a little sanding between each layer of paint. We made a little diagram to remind us where the distressing would be and sanded those places extra well between painting. We use a clear non-yellowing polyurethane to top coat it.

I forgot to take a picture of the armoire. I’ll have to go back over to get one. I will also post the paint color we used.

Beachy/Barn Look- Furniture Painting Tips
July 7, 2011 by Lynn
Filed under Featured Content, Furniture Redos, Home and Garden
For this night stand I wanted that “has been in a barn- painted too many coats-looks kinda beach-y” look. Hahaha you like that description?
I found this gem on KSL for $50 and every penny went to charity, so that’s nice.


It was already great looking for my room, but I wanted to add some color and make it have “the look” I wanted. I just took a trip to Florida and all the furniture in the beach house we stayed in was painted in a fun colorful way. I wanted that look in my bedroom. Here are some of the pieces from the room we stayed in that inspired me.


Fun huh?!
Yes, so how do I achieve that lived in a barn/beachy look?!? Here’s how. SIMPLE!
Don’t sand your piece before painting. (sorry for the blurry picture, it was really late when I did this)
Most of the time you need to sand before you paint, so the paint can stick evenly to your all over piece. But since you don’t want the paint to stick all the way, skip the sanding! Yaahooo! Makes this project go much faster too. I like that

Paint then lightly sand off some of the paint until you get your desired look. I used #220 and #150 grit sand paper

I painted and sanded, then repeated once more to cover a little better.


I top coated twice with a foam brush. And added these handles from Anthropologie. I have had them forever, but didn’t have anything to put them on, this was perfect.
I am very pleased with how this turned out. Beachy-barn here I come

I’ll photograph it in the bedroom when I get the room done. (It will be a while)


